Product Onboarding
Creating Simple Products
Simple products are physical products with a single SKU and no variations.
Start by navigating to Catalogue > Products. Then click Add New Product on the top right corner.
A New Product page will then load. Once here, you can start adding your new product.
Start by selecting Yes by Enable Product – this allows your product to show on the frontend of the Buy Kiwi site.
For Attribute Set, select B2C Products, and then simply fill out the required product details (SKU, price, categories etc).
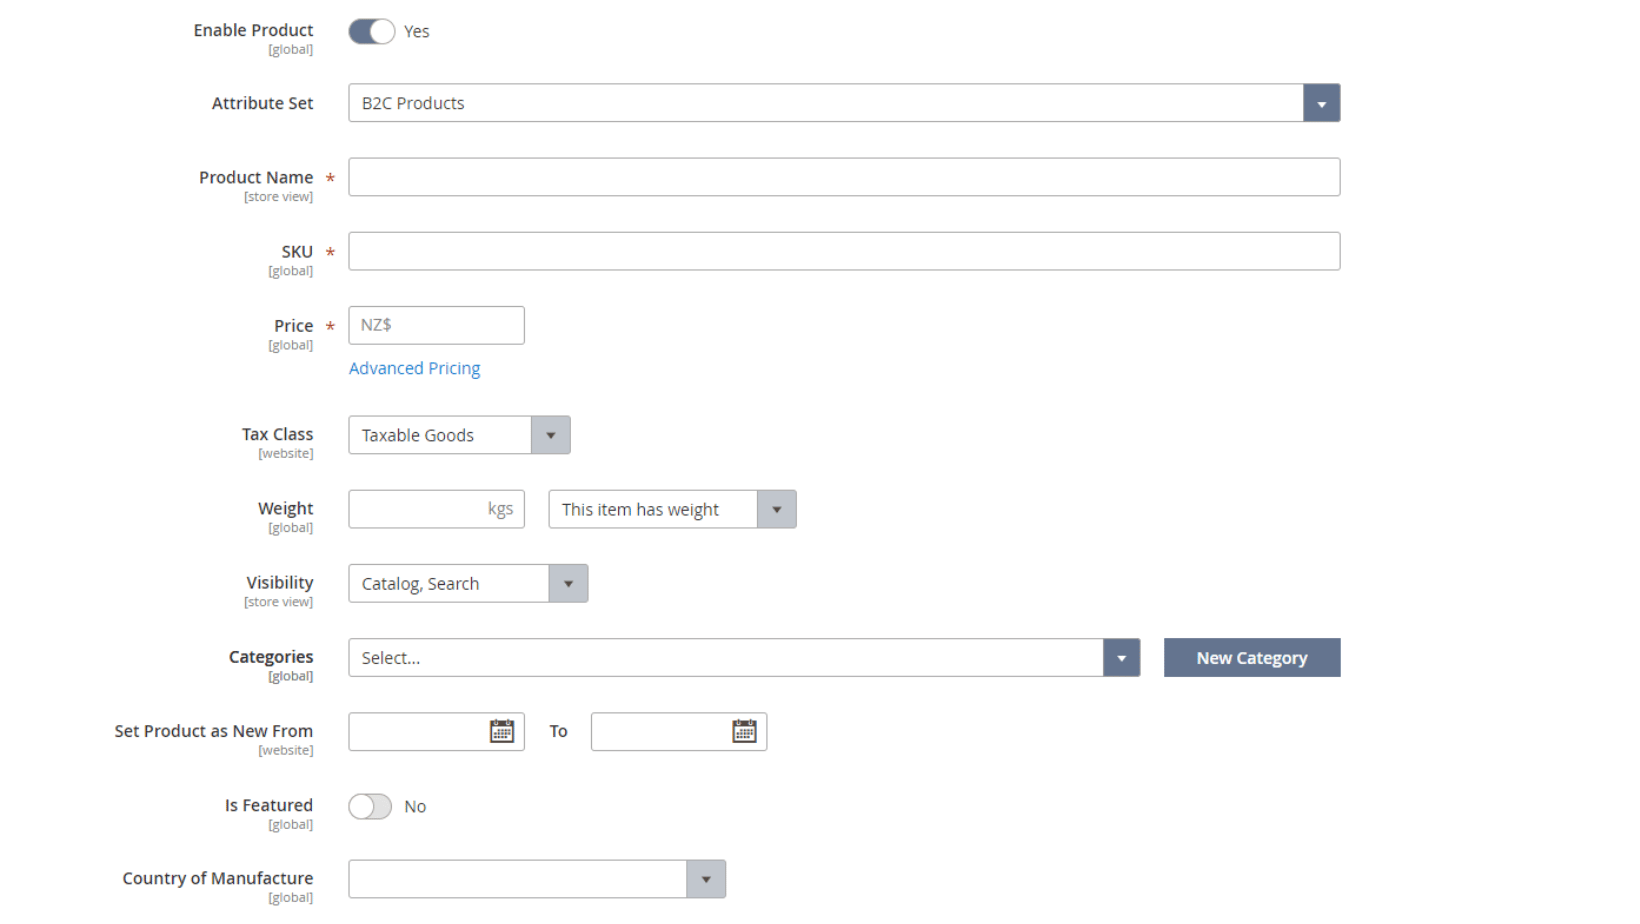
After filling out the required product information, scroll down the page to Sources. This is where you will assign your products to the Source you previously created. Select Assign Sources and then select the Source you created. Then select Done. You will then be taken back to the product upload page where you can update the quantity of stock for your product. Your product will not appear on the front-end of Buy Kiwi if you do not select a Source and input quantity as the system thinks the item is out of stock.
Then navigate to Content. The information that is entered here are the product details the customer will see when browsing your products on the Buy Kiwi site.
Fill out the required information and scroll further down the page to access Images & Videos. This is where you will add product images/videos – if you leave this blank, a Buy Kiwi logo is shown as your product image so please ensure this is updated.
Then scroll down to Manage Enquiry and select Enable from the dropdown box. This allows customers to ask questions about your products and interact with your business.

After completing the product onboarding steps above, run through all the details to ensure everything is correct and accurate, then select Save and navigate back to the products page.
Great job! You’ve successfully created/uploaded a product. The product should appear immediately on the Buy Kiwi site and we recommend you browse in the mind of a customer to ensure all the necessary info is present.
Products created can be updated/edited/changed at any time by accessing the backend of the site through your Seller Login. Please proceed & set up Shipping Options to ensure customers can purchase your products.
Creating Configurable Products
A configurable product is a physical item with different options and variations, such as size and colour. Each variation represents a unique SKU inside the system, allowing you to track inventory.
Start by navigating to Catalogue > Products. Then select the drop down arrow next to Add New Product on the right side of the page and select Configurable Product.
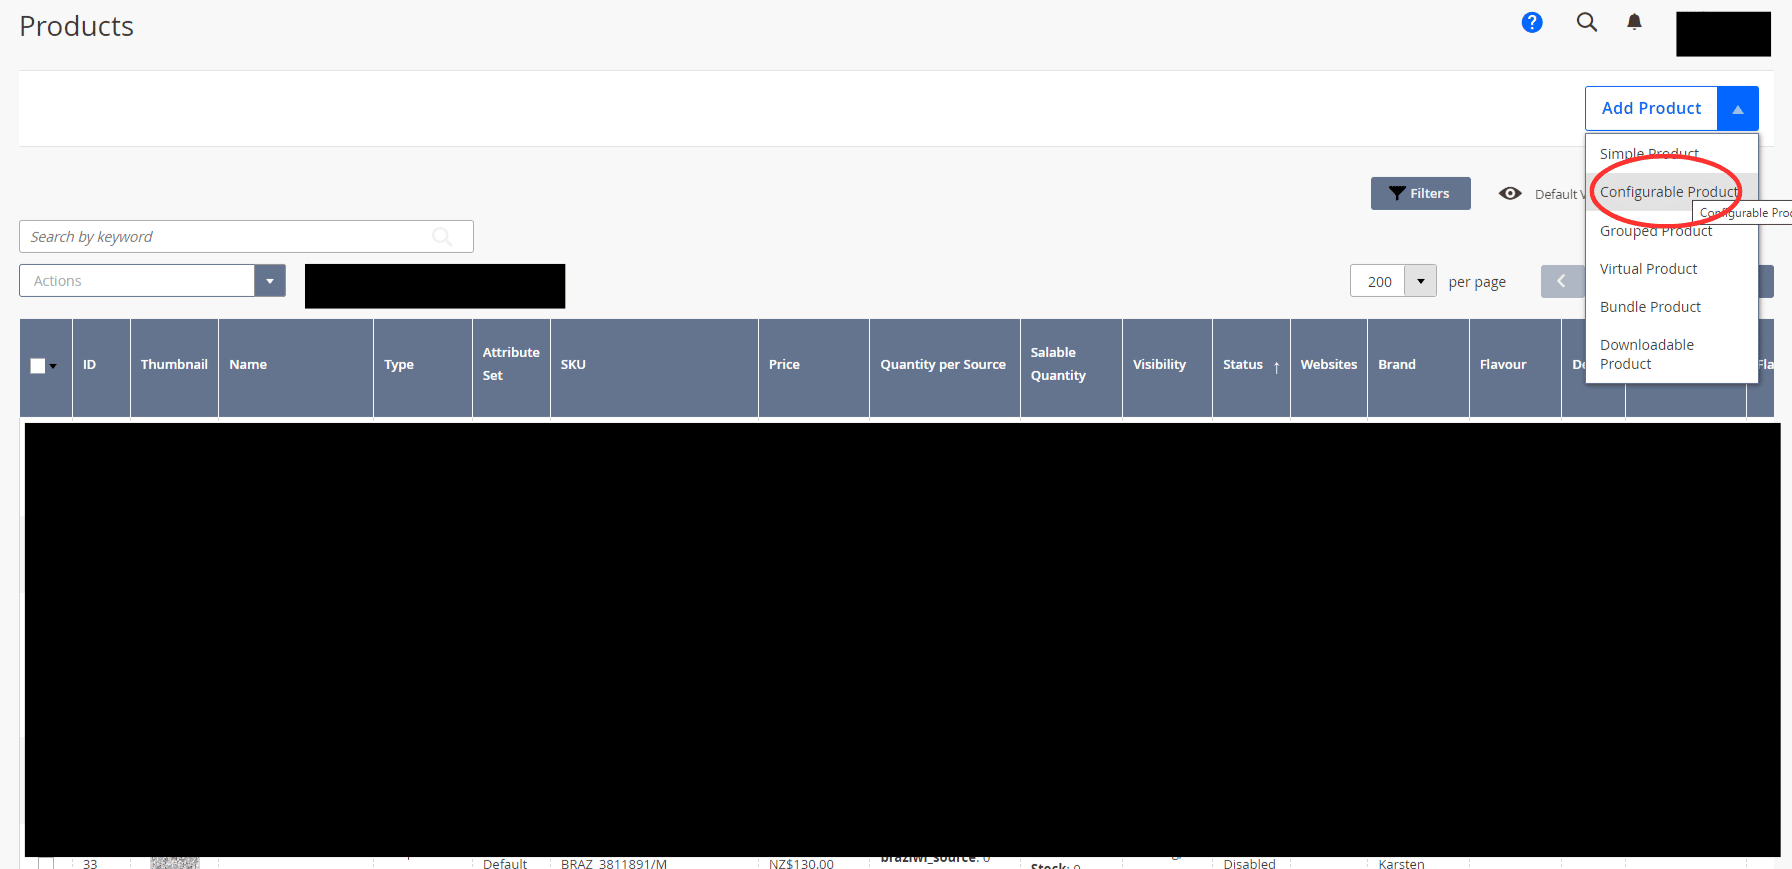
A New Product page will then load, once here, you can start adding your new product.
Start by selecting Yes by Enable Product – this allows your product to show on the frontend of the Buy Kiwi site.
For Attribute Set, select B2C Products or whatever Attribute Set best applies for your product, and then simply fill out the required product details (SKU, price, categories etc).
Then navigate to Content. The information entered here is the product details the customer will see when browsing your poducts on the Buy Kiwi site.
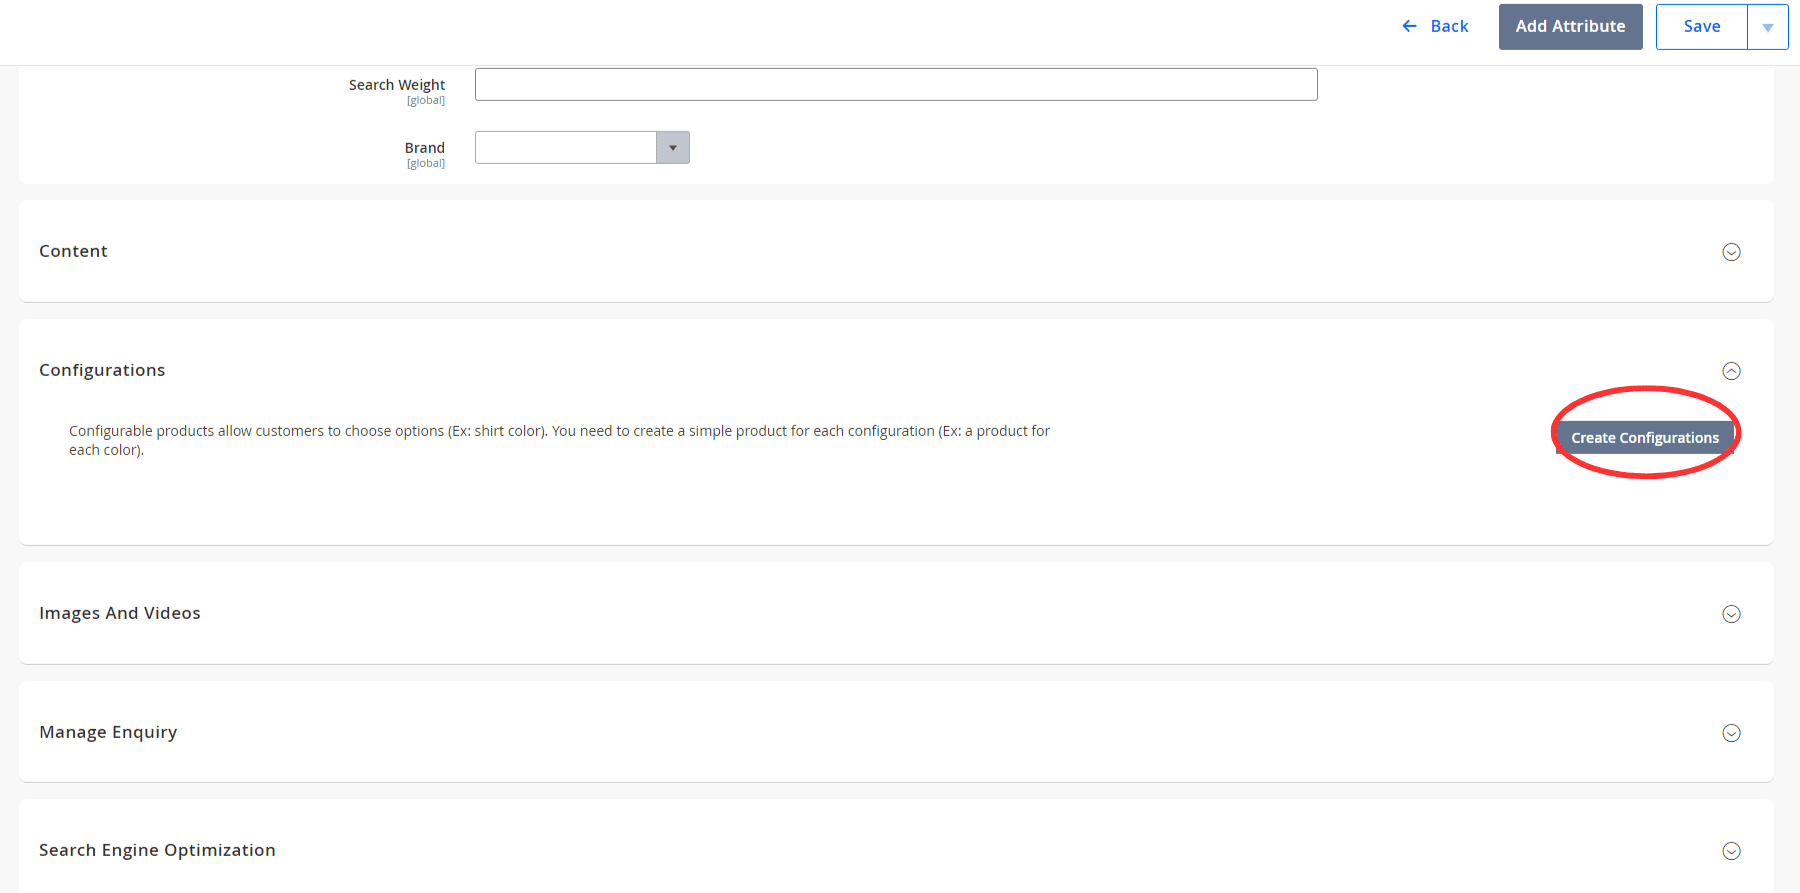
After completing the necessary product details, scroll down to Configurations and then select Create Configurations on the right.
A configuration page will then load, where you can create your product configurations. Start by selecting all attributes that apply for your product. E.g. T-shirt comes in 3 sizes – S, M, L and 2 colours – Black, White. Therefore Colour & Size attributes need to be selected.
Once you’ve selected the appropriate attributes for your product, select Next on the top right.
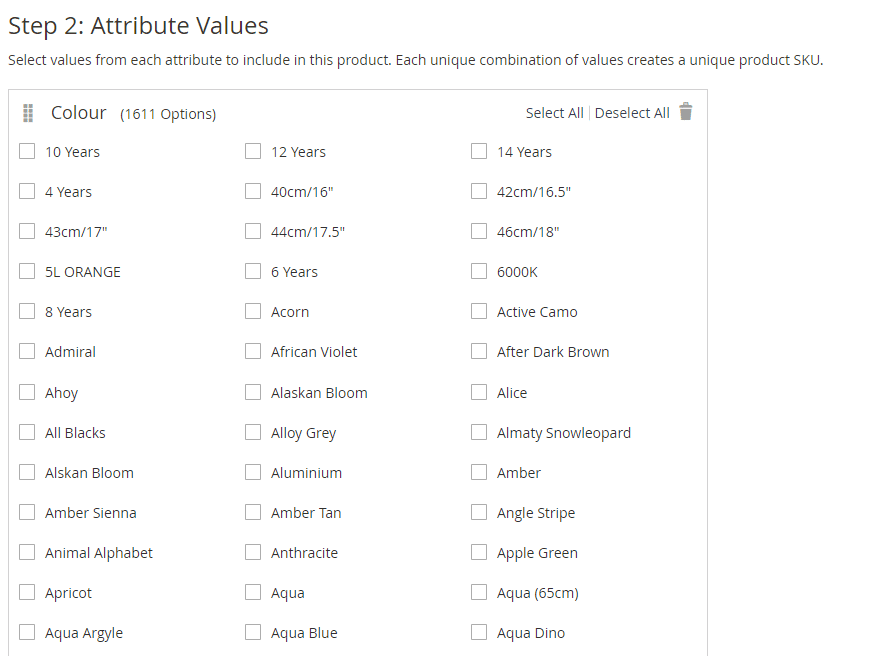

You then need to select the values for each attribute you chose. E.g. Select colours Black & White, and Sizes S,M,L for t-shirt product. The number of options selected will determine the number of variations for a product.
After selecting the appropriate values, select Next on the top right to proceed to the next step.
If you want to set one image to each variation (different colours, for example), click Apply unique images by attribute to each SKU.
The same applies to Price and Quantity.
If you want to change this configuration later, click Next.

After selecting Next, you will be taken to a Summary page where you can review the configurations you have created. If you need to make any changes/edits, you can do so by selecting Back on the top right.
Once you’re satisfied with your created configurable product, simply select Generate Products. You will then be taken back to the main New Product page where you can complete your product set-up.
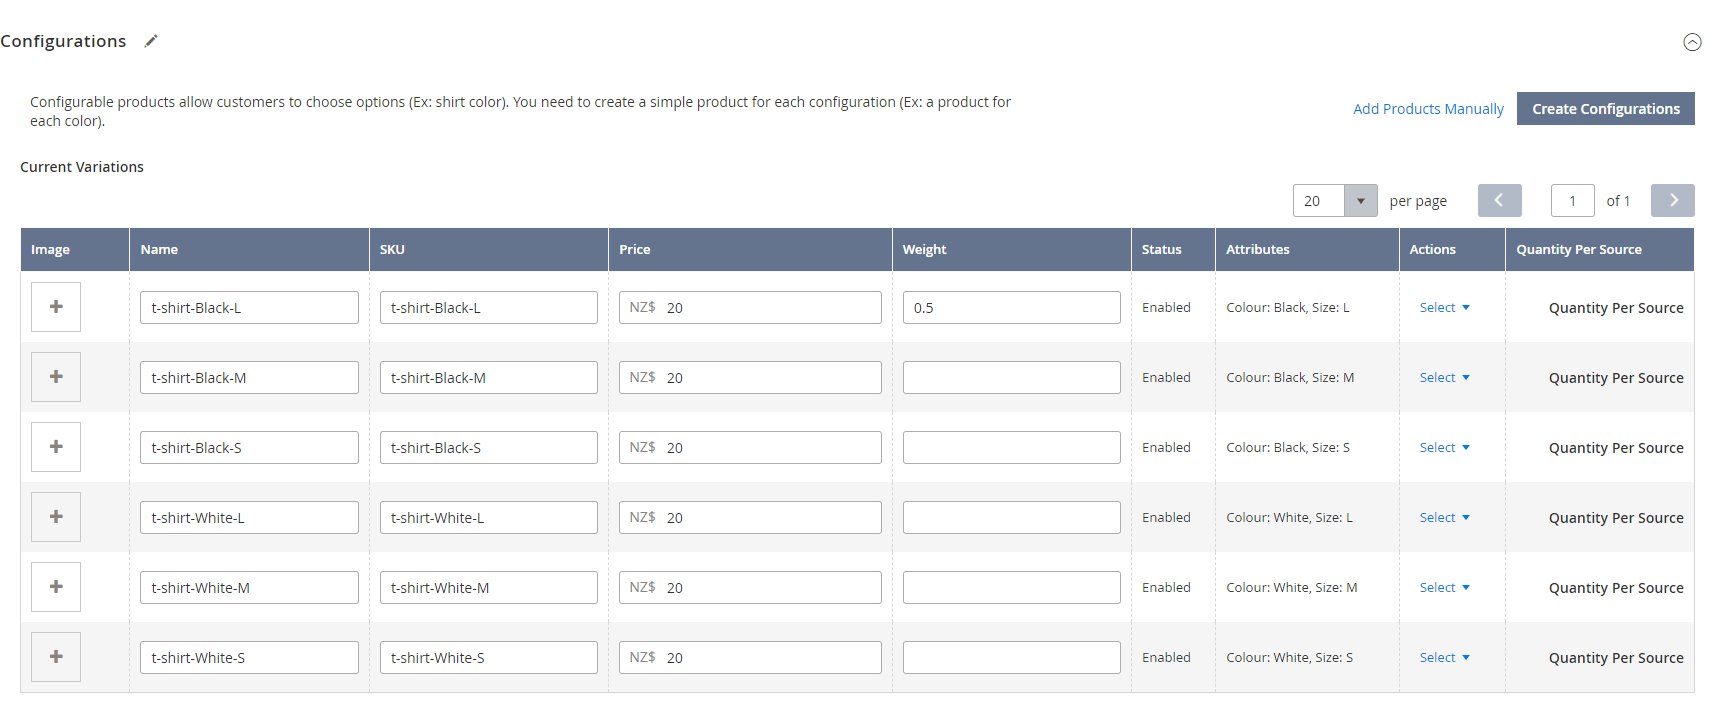
Complete your product set-up by first by uploading a main image for your configurable product under Images & Videos, then selecting Enable under Manage Enquiry so that customers can contact you regarding your product.
Once this is done, simply select Save on the top right of the page.
Great job! You’ve successfully created/uploaded a product. The product should appear immediately on the Buy Kiwi site and we recommend you browse in the mind of a customer to ensure all the necessary info is present.
Products created can be updated/edited/changed at any time by accessing the backend of the site through your Seller Login. Please proceed & set up Shipping Options to ensure customers can purchase your products.
If you have any questions, please contact the Buy Kiwi team at support@buykiwi.co.nz
Company
About Us
Links
Seller Cheat Sheet
Buy Kiwi Automation
Business Listing Set-Up
Seller Store Profile
Product Onboarding
Seller Shipping Options
Setting Special Discounts
